
|
Getting your Trinity Audio player ready...
|
Polygon is a layer-2 scaling solution for Ethereum that offers faster and cheaper transactions. This makes it a popular choice for users who want to transfer their tokens from other chains to Polygon. Understanding how bridging works and choosing the right method can save you time, money, and reduce security risks.
This comprehensive guide covers everything you need to know about bridging tokens to Polygon, including step-by-step instructions, method comparisons, security considerations, and troubleshooting tips.
Understanding Token Bridging
Bridging tokens refers to the process of transferring cryptocurrency assets from one blockchain network (such as Ethereum, Binance Smart Chain, or Solana) to the Polygon network. This isn’t a simple transfer—it’s a complex technical process that involves:
- Locking your original tokens on the source blockchain
- Minting wrapped or equivalent tokens on Polygon
- Maintaining a 1:1 peg between the locked and minted tokens
When you bridge tokens back to the original chain, the wrapped tokens on Polygon are burned, and your original tokens are unlocked. This mechanism ensures that the total supply remains constant across both chains.
Main Bridging Methods
There are three primary ways to bridge tokens to Polygon, each with distinct advantages and trade-offs:
Method 1: Dedicated Bridge Services
A bridge service is a platform specifically designed to facilitate cross-chain transfers. Popular bridge services include:
- Polygon Bridge: The official bridge service for Polygon. Supports ERC-20, ERC-721, and ERC-1155 tokens with the highest level of integration with Polygon’s infrastructure.
- Multichain (formerly Anyswap): A decentralized bridge supporting multiple chains including Ethereum, Polygon, Binance Smart Chain, and Avalanche.
- Hop Protocol: Focuses on cross-chain liquidity and supports Ethereum, Polygon, Arbitrum, and Optimism with faster finality.
Advantages:
- User-friendly interfaces: Most bridge services offer intuitive web interfaces that walk you through the process step-by-step.
- Robust security: Established bridges invest heavily in security audits and have bug bounty programs.
- Speed: Bridge services can process transfers in 7-45 minutes depending on network congestion and the bridge type (optimistic vs. ZK).
- Wide token support: Most major tokens and NFT standards are supported.
Disadvantages:
- Fees: Bridge services charge fees ranging from 0.05% to 0.3% of the transaction value, plus gas fees on both chains.
- Centralization risk: Some bridges use multisig wallets or centralized custodians, introducing counterparty risk.
Method 2: Decentralized Exchanges (DEXs)
Some DEXs like SushiSwap and QuickSwap offer integrated bridging functionality, allowing you to swap and bridge tokens in a single transaction.
Advantages:
- Decentralization: No single entity controls the bridging process, reducing counterparty risk.
- Lower fees: DEXs typically charge 0.1-0.25% trading fees, which can be lower than dedicated bridge services.
Disadvantages:
- Complexity: Requires understanding of liquidity pools, slippage, and token swaps.
- Slower speeds: Can take 30-60 minutes or longer during high network congestion.
- Limited token support: Not all tokens have sufficient liquidity on DEXs for bridging.
Method 3: Centralized Exchange (CEX) Deposits
An often-overlooked method is depositing tokens to a centralized exchange that supports Polygon withdrawals, then withdrawing directly to your Polygon wallet. Exchanges like Binance, Crypto.com, and Coinbase support this.
Advantages:
- Simplicity: No need to interact with smart contracts or understand bridging mechanics.
- Lower fees: Many exchanges offer free or subsidized Polygon withdrawals.
- Speed: Withdrawals typically complete in 5-15 minutes.
Disadvantages:
- Centralization: You must trust the exchange with custody of your tokens during the process.
- KYC requirements: Most exchanges require identity verification.
- Limited availability: Not all tokens are supported on all exchanges.
Quick Comparison Table
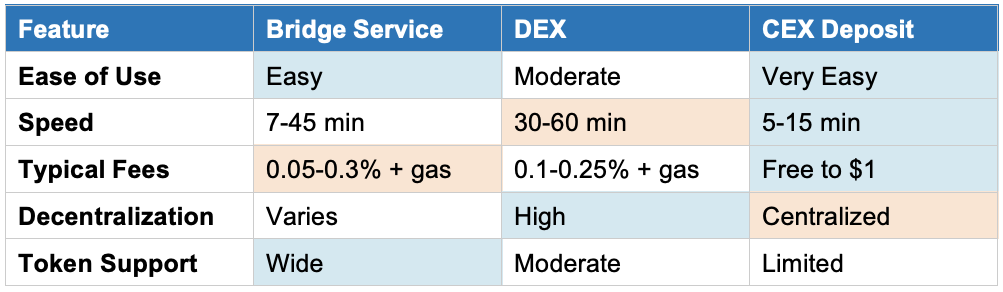
Step-by-Step Guide: Bridging with Polygon Bridge
Here’s a detailed walkthrough using the official Polygon Bridge, the most popular method:
- Prepare Your Wallet
Install a Web3 wallet (MetaMask, WalletConnect, or Coinbase Wallet). Ensure you have sufficient ETH in your Ethereum wallet to cover gas fees. Gas fees vary but typically range from $5-$50 depending on network congestion.
- Visit the Polygon Bridge
Navigate to https://wallet.polygon.technology/polygon/bridge/ and connect your wallet by clicking ‘Connect Wallet’ in the top right corner.
- Select Source and Destination
Choose your source chain (e.g., Ethereum Mainnet) and destination chain (Polygon PoS). The interface will automatically detect supported tokens in your wallet.
- Choose Your Token and Amount
Select the token you want to bridge and enter the amount. The bridge will show you an estimate of the fees and the amount you’ll receive on Polygon.
- Approve the Token (First-Time Only)
If this is your first time bridging this specific token, you’ll need to approve the bridge contract to access your tokens. This is a separate transaction that requires gas fees. Click ‘Approve’ and confirm in your wallet.
- Initiate the Bridge Transfer
Click ‘Transfer’ and confirm the transaction in your wallet. You’ll see the estimated gas fee at this stage. The transaction will be submitted to the Ethereum network.
- Wait for Confirmation
The bridge uses a Plasma or PoS mechanism depending on the token. For the standard PoS bridge:
- Your tokens will be locked on Ethereum (confirmed after 12-15 block confirmations, roughly 3-5 minutes)
- Equivalent tokens will be minted on Polygon (typically 7-8 minutes total)
- Verify Receipt on Polygon
Switch your wallet network to Polygon PoS. You should see the bridged tokens in your wallet. You can verify the transaction on PolygonScan (https://polygonscan.com/) by searching for your wallet address.
- Add Token to Wallet (If Needed)
If the token doesn’t appear automatically, you may need to manually add it to your wallet using the Polygon token contract address. You can find this on PolygonScan or the bridge interface.
Enhanced Security Considerations
Smart Contract Risks
Bridges are high-value targets for hackers. Major bridge exploits have resulted in hundreds of millions of dollars in losses. To protect yourself:
- Check audit history: Only use bridges that have been audited by reputable firms like Trail of Bits, Certik, or OpenZeppelin.
- Review TVL (Total Value Locked): Bridges with higher TVL have more skin in the game and are more likely to have robust security.
- Start small: For your first bridge transaction, transfer a small test amount to ensure everything works correctly.
Phishing and Scam Sites
Scammers create fake bridge websites to steal your tokens. Always:
- Bookmark official URLs and only use those bookmarks
- Verify the URL carefully—scammers use similar-looking domains
- Never click on bridge links in unsolicited messages or tweets
Wallet Security
- Never share your seed phrase or private keys
- Review all transaction details in your wallet before confirming
- Consider using a hardware wallet for large transfers
Understanding Gas Fees
Gas fees are often the most significant cost when bridging, especially from Ethereum. Here’s what you need to know:
Ethereum Gas Fees
- Approval transaction: $5-$15 (first time per token)
- Bridge transaction: $15-$50+ depending on network congestion
- Total first-time cost: $20-$65+ in gas fees alone
Gas-Saving Tips:
- Monitor gas prices using tools like Etherscan Gas Tracker or GasNow
- Bridge during off-peak hours (weekends, late nights UTC)
- Consider using a layer-2 solution like Arbitrum or Optimism first, then bridging to Polygon for lower fees
Polygon Network Fees
Once on Polygon, transaction fees are typically $0.01-$0.10, making it much more affordable for frequent transactions. You’ll need a small amount of POL (Polygon’s native token) to pay for gas on the Polygon network. Some bridges provide a small amount of POL automatically, but you may need to use a faucet or purchase some.
Troubleshooting Common Issues
Transaction Stuck or Pending
Issue: Your Ethereum transaction has been pending for hours.
Solutions:
- Check the transaction on Etherscan—if it’s pending, you may need to speed it up by increasing the gas fee
- Most wallets have a ‘speed up’ or ‘cancel’ option for pending transactions
Tokens Not Appearing on Polygon
Issue: The bridge shows success, but tokens aren’t in your Polygon wallet.
Solutions:
- Make sure you’ve switched your wallet to the Polygon network
- Manually add the token contract address (find it on PolygonScan or the bridge interface)
- Wait longer—some bridges can take 30-45 minutes during high congestion
Approval Transaction Failed
Issue: Token approval transaction failed.
Solutions:
- Increase gas limit slightly (add 10-20%) and try again
- Check that you have enough ETH for gas fees
Wrong Network Selected
Issue: Accidentally sent tokens to the wrong network.
Prevention: Always double-check the network in your wallet before confirming. If you’ve already sent tokens to the wrong network, recovery may be possible but requires technical knowledge—contact the bridge’s support team immediately.
The MATIC to POL Upgrade
Polygon has undergone a significant upgrade, transitioning from MATIC to POL as its native token. This upgrade is part of Polygon 2.0, a major overhaul aimed at creating a unified liquidity layer for multiple chains.
What This Means for Bridging
- Automatic compatibility: Wallets and bridges that supported MATIC automatically recognize POL.
- No action required: Existing MATIC tokens are automatically recognized as POL in most cases.
- One-way migration: While MATIC can be upgraded to POL, POL cannot be downgraded to MATIC.
For bridge users, this transition is seamless. Whether you’re bridging ‘MATIC’ or ‘POL,’ the tokens are functionally the same and work across the Polygon ecosystem. However, it’s wise to keep your wallet software updated to ensure optimal compatibility.
Bridging Tokens Back to Ethereum or Other Chains
Bridging back from Polygon to Ethereum or another chain follows a similar process, but with one key difference: withdrawal time.
PoS Bridge Withdrawals
- Challenge period: Withdrawals from Polygon to Ethereum via the PoS bridge require a 3-hour checkpoint waiting period.
- Two transactions: You’ll initiate the burn on Polygon (cheap, ~$0.01-$0.10), then after the checkpoint, claim your tokens on Ethereum (expensive, $15-$50+ in gas).
Plasma Bridge Withdrawals
- 7-day challenge period: For the Plasma bridge, withdrawals take 7 days as a security measure.
Faster Alternatives
To avoid long wait times:
- Use third-party bridges: Services like Hop Protocol or Connext offer fast withdrawals (minutes instead of hours/days) in exchange for a slightly higher fee.
- Deposit to a CEX: Transfer to a centralized exchange that supports both Polygon deposits and Ethereum withdrawals.
Advanced Considerations
Liquidity and Slippage
When bridging through DEXs or liquidity-based bridges:
- Check liquidity: Large transfers may experience slippage if the liquidity pool is small.
- Set slippage tolerance: Most DEXs allow you to set a maximum acceptable slippage (e.g., 0.5%-2%).
Wrapped vs. Native Tokens
Understand the difference:
- Wrapped tokens: When you bridge tokens, you often receive a ‘wrapped’ version (e.g., Wrapped ETH or WETH). These are 1:1 pegged to the original.
- Native tokens: Some protocols require the native version. You can unwrap tokens using DEXs or specific unwrap functions.
Tax Implications
In many jurisdictions, bridging tokens is not a taxable event since you’re simply moving the same asset between chains. However, if you swap tokens as part of the bridging process (e.g., ETH → WETH → MATIC), this may be considered a taxable trade. Consult with a tax professional familiar with cryptocurrency to understand your obligations.
Best Practices Summary
- Research thoroughly: Verify the bridge service’s security, audit history, and reputation before trusting it with your assets.
- Compare fees: Check bridge fees, gas costs, and total expenses across multiple platforms.
- Monitor gas prices: Bridge during low-traffic periods to save on Ethereum gas fees.
- Start small: Test with a small amount first to ensure the process works correctly.
- Keep records: Save transaction hashes and screenshots for tax purposes and troubleshooting.
- Stay informed: Follow official Polygon and bridge service announcements for updates, maintenance, or security issues.
- Be patient: Network congestion happens. If a bridge is taking longer than expected, wait before attempting a second transaction.
Conclusion
Bridging tokens to Polygon opens up a world of possibilities—from low-cost trading on DEXs to participating in DeFi protocols without paying exorbitant Ethereum gas fees. By understanding the different bridging methods, security risks, and best practices outlined in this guide, you can confidently move your assets to Polygon and take full advantage of its fast, affordable ecosystem. Whether you choose a dedicated bridge service, a DEX, or a centralized exchange, always prioritize security, verify all details, and stay informed about the latest developments in the rapidly evolving world of cross-chain transfers.
Frequently Asked Questions
1. What is Polygon and why would I want to bridge tokens to it?
Polygon is a Layer-2 scaling solution built on top of Ethereum. It’s designed to provide faster and significantly cheaper transactions compared to the main Ethereum network. You’d want to bridge tokens to Polygon to take advantage of these benefits for various activities like trading, staking, or using decentralized applications (dApps) without incurring high gas fees.
2. What does ‘bridging tokens’ mean in the context of Polygon?
Bridging tokens refers to the process of transferring your cryptocurrency assets from one blockchain network (like Ethereum, Binance Smart Chain, or Solana) to the Polygon network. This process essentially ‘locks’ your tokens on the original chain and ‘mints’ an equivalent wrapped version of those tokens on Polygon, allowing you to use them within the Polygon ecosystem.
3. Can you give examples of popular bridge services for Polygon?
Yes, some widely used bridge services include:
- Polygon Bridge: The official bridge, known for supporting a wide range of token standards (ERC-20, ERC-721, ERC-1155).
- Multichain (formerly Anyswap): A decentralized bridge supporting various chains beyond Ethereum and Polygon.
- Hop Protocol: A decentralized bridge that focuses on efficient cross-chain liquidity transfers.
4. What are the main security risks associated with bridging tokens?
The biggest risks are hacks and exploits, as bridge services and DEXs are frequent targets for malicious actors. Another significant concern is counterparty risk, especially with centralized bridges, where the loss of the service could mean the loss of your tokens. Always ensure the service you use has undergone professional security audits and has a strong track record.
5. How do gas fees affect bridging tokens to Polygon?
Gas fees are a cost you pay to blockchain network validators to process your transactions. When bridging, you’ll incur gas fees on the originating network (e.g., Ethereum’s often high gas fees, ranging from $20-$65+ for first-time bridging including approval). Once on Polygon, transaction fees are minimal ($0.01-$0.10). Gas fees vary significantly based on network congestion, so monitoring gas prices and bridging during off-peak hours can save money.
6. How do I choose the right method for bridging my tokens?
Your choice depends on your priorities:
- For convenience and ease of use: A reputable bridge service like Polygon Bridge is often the best choice.
- For decentralization and lower fees: A DEX might be better if you’re comfortable with a more complex process.
- For maximum simplicity and speed: Using a centralized exchange that supports Polygon can be the fastest and cheapest option.
Always prioritize doing your own research (DYOR) on the service’s reputation and security, and compare fees across platforms.
7. Do I need a new wallet for POL tokens if I previously used MATIC?
No, you generally don’t need a new wallet. The transition from MATIC to POL is designed to be smooth and backward-compatible. Most wallets that currently support MATIC will automatically recognize and handle POL. However, it’s always wise to ensure your chosen wallet is updated and compatible with Polygon’s latest network upgrades to avoid any issues.
8. How long does it typically take to bridge tokens to Polygon?
Bridge times vary by method: official Polygon Bridge typically takes 7-45 minutes, DEXs may take 30-60 minutes, and centralized exchange withdrawals usually complete in 5-15 minutes. Times can be longer during network congestion.
9. Can I bridge tokens back from Polygon to Ethereum?
Yes, you can bridge tokens back to Ethereum or other supported chains. However, PoS bridge withdrawals require a 3-hour checkpoint period, while Plasma bridge withdrawals take 7 days. For faster alternatives, consider using third-party bridges like Hop Protocol or depositing to a centralized exchange.
10. What should I do if my bridged tokens don’t appear in my wallet?
First, ensure you’ve switched your wallet to the Polygon network. If tokens still don’t appear, you may need to manually add the token using its Polygon contract address, which can be found on PolygonScan. Also, be patient—some bridges can take up to 45 minutes during high congestion. If the issue persists, check the transaction status on PolygonScan using your wallet address and contact the bridge’s support team if needed.
I’m the cryptocurrency guy who loves breaking down blockchain complexity into bite-sized nuggets anyone can digest. After spending 5+ years analyzing this space, I’ve got a knack for disentangling crypto conundrums and financial markets.


